|
1962 Triumph TR4 Restoration |
|
Brian Sanborn, Groton, MA |
Getting It Back Together
It Came Out... It Has to Go Back In
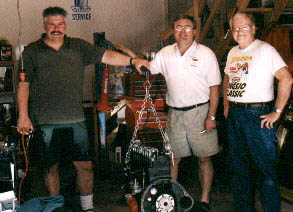
This is the crack team that put the engine back in the car. That's me in the middle with Barry Fox on the right. Barry is a local TR4A enthusiast and was part of the engine pull team last fall. On the left, is Craig Della Penna. Craig has his own nice surrey topped TR4 and offered to help... just for the experience. He was a big help pushing the heavy engine/gearbox around while it was going into the engine bay.
The procedure is not rocket science... just the reverse of the engine removal. The gearbox and clutch get installed next. The clutch and flywheel should have been balanced as a unit. The machine shop will make alignment marks.... make sure it goes back together right. After soaking in oil for 24 hours, the pilot bearing goes into the center recess in the flywheel.
Now using a plastic clutch alignment tool tighten and torque down the clutch pressure plate. The alignment ensures that the clutch disk is centered and ready to mate with the gearbox input shaft. Make sure the fan belt is hanging on the engine... it will hard to install later.
 We
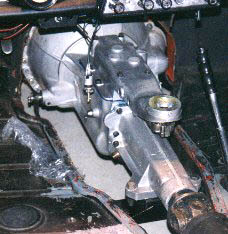
were too busy grunting and groaning for any pictures while stuffing the engine back in. Keep the engine stripped
of any attachments that will get damaged during the installation. Have one person in the cockpit guiding the end
of the gearbox housing under the bulkhead opening. He or she will have to actually stand on of the end shaft to
keep the engine and gearbox from damaging the accelerator shaft. It's just like slipping into a pair of tight loafers.
The last couple of inches requires careful attention between the front and back folks. The front motor mounts should
be new and they take a little pry bar work to line up the engine front plate mounting feet and the threaded stud
coming out the top of the chassis engine mount. The rear gearbox mount should be new as well and be sure it is
torqued down. Once you get it in just drop dead and take a breather.
We
were too busy grunting and groaning for any pictures while stuffing the engine back in. Keep the engine stripped
of any attachments that will get damaged during the installation. Have one person in the cockpit guiding the end
of the gearbox housing under the bulkhead opening. He or she will have to actually stand on of the end shaft to
keep the engine and gearbox from damaging the accelerator shaft. It's just like slipping into a pair of tight loafers.
The last couple of inches requires careful attention between the front and back folks. The front motor mounts should
be new and they take a little pry bar work to line up the engine front plate mounting feet and the threaded stud
coming out the top of the chassis engine mount. The rear gearbox mount should be new as well and be sure it is
torqued down. Once you get it in just drop dead and take a breather.
Wow! Glad that's over
 Now is a good time to hook up the speedometer drive and an electrical stuff if you are lucky enough
to have an overdrive unit. Don't install the gearbox cover yet. You must re-install all the subsystems. Start by
installing the starter motor, which should have been rebuilt with new bushings, brushes and springs if needed....
then the exhaust and intake manifolds. I kept the whole major assembly with the carbs, linkage and intake manifold
as one unit in a plastic bag over the winter to guarantee that these parts were not part of any problem when it
came time for starting the engine. Next winter both carbs will get a complete overhaul along with a original style
fuel pump that I picked up.
Now is a good time to hook up the speedometer drive and an electrical stuff if you are lucky enough
to have an overdrive unit. Don't install the gearbox cover yet. You must re-install all the subsystems. Start by
installing the starter motor, which should have been rebuilt with new bushings, brushes and springs if needed....
then the exhaust and intake manifolds. I kept the whole major assembly with the carbs, linkage and intake manifold
as one unit in a plastic bag over the winter to guarantee that these parts were not part of any problem when it
came time for starting the engine. Next winter both carbs will get a complete overhaul along with a original style
fuel pump that I picked up.
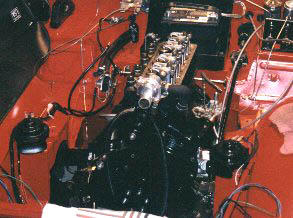
The exhaust downpipe can be connected and all the hangers tightened up. As long as we are on this side of the engine, install the generator. I rebuilt mine with new brushes and bearings. Move around front and install the fan with new rubber mounts and install the water pump if you have done so yet.
 On
the left side, the heater pipe, oil pressure pipe, tachometer and steering shaft can be put back in place. The
distributor should be lined up with the number one cylinder at top dead center with the distributor rotor pointing
at the first sparkplug. Haynes and TR4 Workshop manuals give clear instructions.
On
the left side, the heater pipe, oil pressure pipe, tachometer and steering shaft can be put back in place. The
distributor should be lined up with the number one cylinder at top dead center with the distributor rotor pointing
at the first sparkplug. Haynes and TR4 Workshop manuals give clear instructions.
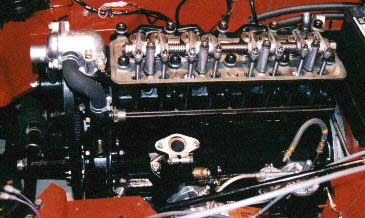
Install the fuel lines to both sides of the fuel pump. I recommend that you install one of those plastic fuel shut off valves in the rubber input hose to control fuel spills during servicing in the future. Connect the fuel lines to the carbs and attach the vacuum line for the distributor advance. The new push rods and rebuilt rocker assembly should be installed and adjusted to .010 clearance. A new rocker shaft is almost mandatory and new bronze bushes in the rockers are required. I had the ends of the rocker that drives the valve stem dressed flat and hardened at the machine shop.
You may run into a problem here with the length of the pushrods. If the head has been shaved for more compression or just a couple of times for a clean surface.... or the new push rods are on the long side of "in spec".... you can end up with pushrods that are too long to allow for proper rocker adjustment. Ask me how I know. There are two alternatives available. You can replace the standard pushrods with shorter ones which are available from BPNW and TSI Imports. Or you can place brass shims under the rocker pedestals to raise the whole assembly. Be sure to accommodate the oil feed oil in the rear pedestal. Both these procedures restores the original geometry and adjustment space.