|
1962 Triumph TR4 Restoration |
|
Brian Sanborn, Groton, MA |
Dashboard Rebuild and
Cleaning Up the Interior

Restored Dash and Gauges
and Other Restored Parts
When I bought my car, it came with a wooden dash overlay. These were common aftermarket options in late 1963 and beyond. Triumph started offering it as a factory option in 1964-65. The option became standard on the TR4A. But my original 1962 BRG TR4 had the factory white dash and I wanted to bring my current 1962 car back to its original look and trim. This meant stripping off the wooden overlay, dismantling the dashboard, gauges and crash pads. The steering column was loose both where the steering column mounted to the car and also the shaft within the the column. And to top it off, the steering column had been damaged by an aftermarket steering wheel that rubbed off a lot of the metal on the column where it mated with the steering wheel hub.
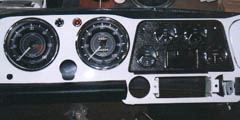
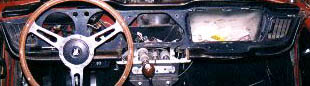 As
you can see in this picture, the PPO had painted the dash black as a backdrop for the the wood dash overlay. The
crash pads were all dried out and cracking and the wiring harness was completely invaded with spray oil from the
worn bulkhead grommets. I had some problems to solve finding a metal glove box door and hinge system. Ken Nuelle,
on the Triumph List, helped me out here along with a couple of other retro parts that are hard to find. I also
had to locate a period black gauge bezel. Ken had sent me a silver one and I traded that to Brad Kahler for a black
one from Andy Mace. Brad and Andy traded something to complete the triangle. The help you get from the Triumph
List folks and TR folks in general is really great.
As
you can see in this picture, the PPO had painted the dash black as a backdrop for the the wood dash overlay. The
crash pads were all dried out and cracking and the wiring harness was completely invaded with spray oil from the
worn bulkhead grommets. I had some problems to solve finding a metal glove box door and hinge system. Ken Nuelle,
on the Triumph List, helped me out here along with a couple of other retro parts that are hard to find. I also
had to locate a period black gauge bezel. Ken had sent me a silver one and I traded that to Brad Kahler for a black
one from Andy Mace. Brad and Andy traded something to complete the triangle. The help you get from the Triumph
List folks and TR folks in general is really great.
The steering wheel is a new one I found from one of those parts guys that shows up at car shows. It's a Motolita,
but has the triangle pattern and a darker walnut finish that makes it look a whole lot better the one offered today.
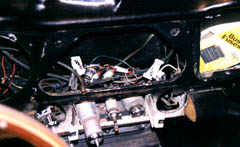
This first step was to remove the windshield. I ended up replacing the glass because the old glass was so worn from 36 years of sand a road dirt that you could not drive at night safely. I took everything apart carefully and used masking tape to identify the wiring harness connections and used a marking pen to make the same mark on the back of the gauges. It would be many months before this would go back together and I had to be able to put it all back together without wiring problems. I was very concerned about using the existing wiring harness. Aside from the oiliness which, I suppose could be cleaned or ignored, the wires were very brittle and the insulation was easy to crack open. By Christmas time I had decided to use a TRF gift certificate my wife gave me to buy a new harness.
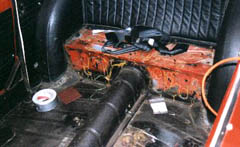
After disassembling, labeling and bagging everything, this is what it looks like. In this picture on the left, I have started to install the new harness after transferring all the labels from the old harness and testing the circuits for continuity and isolation with a test meter. One of the blessings of a San Francisco car is that the interior and floors are original and rust free. One of the PPOs had painted all the trouble spots with undercoating. This is a blessing and a curse, because you can't get the stuff off when you need to.
 I had the metal dash face
bead blasted to a clean metal and had a cracked dash center support mount welded. The dash was then off to the
local body shop to be painted in the original white with a modern clearcoat on top. While waiting, I wire-brushed
and repainted all the other dash pieces. The center support got a coat of original black wrinkle paint. During
this phase, I found a new steering column, and rebuilt it with new nylon bearings, new paint, new horn ring assembly
and proper decals. The gauges were each dismantled, cleaned, touched up with paint if needed, oiled where needed
and assembled with "End-Dust" to keep the dial faces clean. The heater was removed and cleaned out. Boy
were there a lot of bugs and leaves in there. I touched up any place under the dashboard where surface rust was
starting. The heater went back in with new hoses and bulkhead plate.
I had the metal dash face
bead blasted to a clean metal and had a cracked dash center support mount welded. The dash was then off to the
local body shop to be painted in the original white with a modern clearcoat on top. While waiting, I wire-brushed
and repainted all the other dash pieces. The center support got a coat of original black wrinkle paint. During
this phase, I found a new steering column, and rebuilt it with new nylon bearings, new paint, new horn ring assembly
and proper decals. The gauges were each dismantled, cleaned, touched up with paint if needed, oiled where needed
and assembled with "End-Dust" to keep the dial faces clean. The heater was removed and cleaned out. Boy
were there a lot of bugs and leaves in there. I touched up any place under the dashboard where surface rust was
starting. The heater went back in with new hoses and bulkhead plate.
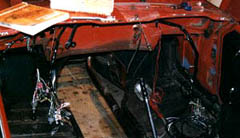
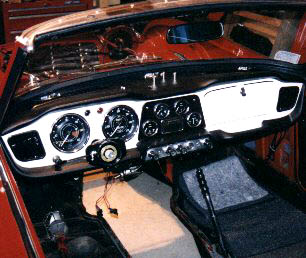
 After
the new harness was in place, the new metal dash can be re-installed. This was done before the engine and gearbox
went back in the car. This gives you more room to work under the dash. I first attached the rebuilt vent assemblies
and new plastic vents that I found in a box of spare parts that came with the car. The new left and right crash
pads were also attached now. The dash is attached at the top to the scuttle and on the sides. Then the new gauge
bezel and gauges were installed and connected to the harness. Leave everything hand tight because the top crash
pad must be installed with the front edge under and in the seam between the scuttle and the dash.
After
the new harness was in place, the new metal dash can be re-installed. This was done before the engine and gearbox
went back in the car. This gives you more room to work under the dash. I first attached the rebuilt vent assemblies
and new plastic vents that I found in a box of spare parts that came with the car. The new left and right crash
pads were also attached now. The dash is attached at the top to the scuttle and on the sides. Then the new gauge
bezel and gauges were installed and connected to the harness. Leave everything hand tight because the top crash
pad must be installed with the front edge under and in the seam between the scuttle and the dash.
After the top crash pad was installed the windshield frame is installed. The leading edge of the crash pad is held down under the windshield frame rubber mounting grommet. The steering column, the rest of the wiring and controls are added. Here it is all finished, waiting for the engine and gearbox to go back in. Once the engine and gearbox are in place, the rest of the interior can be re-installed
Just like it looked in 1962