|
1962 Triumph TR4 Restoration |
|
Brian Sanborn, Groton, MA |
Gearbox and Clutch Rebuild
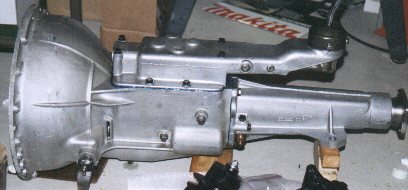
Rebuilt Gearbox Waiting for Installation
The gearbox rebuild was something I was not ready for. My long term goal was to upgrade to an overdrive unit and I had plenty to do that winter. But the shipwrights disease kept kicking in on every decision. When removed from the car, the gearbox was working OK but made some unhealthy noises in the process.
The final decision to rebuild was based on my assessment of the very high mileage on the engine. And since engine and gearbox were a matched set from a TR4A donor car, the gearbox had the same high mileage on it. It was just plain stupid to put a worn out transmission back into the car. I could not justify the cost of sending it out for a $900 rebuild and another spare gearbox I have would be suspect as well. I ended up spending about $250 in parts and machine shop work. The machine shop was used to remove and insert the small roller bearings in the input shaft and on either end of the laygear.
I did a thorough restoration but I didn't go nuts. My assumption was that within 2-5 years I would find an overdrive unit and do a complete, "replace everything", rebuild on that unit. I will not try to do a step-by-step on the rebuild. The Haynes manual will take you through it with lots of detail. It also covers how to do the work without most of the special tools shown in the TR workshop manual. I followed the book exactly and used the workshop manual as the correct source for torque specs. It is not easy, but if you think you can do the engine then the gearbox is within reach.
When I got the case open and started the teardown, I found a lot of heavy wear and a nicked tooth on the 2nd
gear. I ended up replacing the 2nd gear, the layshaft, layshaft end bearings and retainer clip, as well as all
the roller bearings, the 3 big ones for the mainshaft and the 3 small internal ones. New oil seals were used throughout.
I did replace all the brass synchromesh rings but not all the brass bearings on the mainshaft between the gears.
The original ones were all well within wear specs and when all lined up on the mainshaft they were within spec
for the final measurement. I did clean every single part completely, leaving no residues on any reused part.
synchromesh rings but not all the brass bearings on the mainshaft between the gears.
The original ones were all well within wear specs and when all lined up on the mainshaft they were within spec
for the final measurement. I did clean every single part completely, leaving no residues on any reused part.
I refilled the gearbox with modern synthetic 90W hypoid oil from Redline. However, based on some recent info from the Triumph List, I will be going back to the regular GL4 90 hypoid oil specified in the manual. Before finishing, I attached a big 1/2 drill to the input shaft and ran the gearbox through its paces in each gear. The first time I put it all together I had installed the reverse gear backwards and without the test would have found the problem on the car.
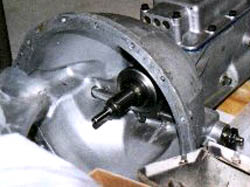
Clutch and Throw-out Bearing
I ordered a new Borg & Beck diaphragm clutch set from BPNW that included a new throw-out bearing. The old one was shot for sure. Don't forget to have the flywheel/clutch assembly balanced at the machine shop.
 I
did do something extra here. I noticed extreme wear on the bearings and metal surfaces of the clutch lever shaft.
The original shaft was unusable. The earlier TR4 gearboxes used a wider bearing and grease nipples on booth sides
of the shaft to drive grease into the bearings. The TR4A units had converted to no grease nipples and smaller bearings,
a problem waiting to happen. So I decided to use the older style shaft from a spare early type gearbox that I had
on hand and to use the bigger set of bearings to create the most bearing surface as possible in the bell housing
mount area.
I
did do something extra here. I noticed extreme wear on the bearings and metal surfaces of the clutch lever shaft.
The original shaft was unusable. The earlier TR4 gearboxes used a wider bearing and grease nipples on booth sides
of the shaft to drive grease into the bearings. The TR4A units had converted to no grease nipples and smaller bearings,
a problem waiting to happen. So I decided to use the older style shaft from a spare early type gearbox that I had
on hand and to use the bigger set of bearings to create the most bearing surface as possible in the bell housing
mount area.
To install the new throw-out bearing in the old brass collar, I used the method of warming the bearing and putting the collar in the freezer. This allowed the two parts to be assembled with relative ease.