|
1962 Triumph TR4 Restoration |
|
Brian Sanborn, Groton, MA |
New Top
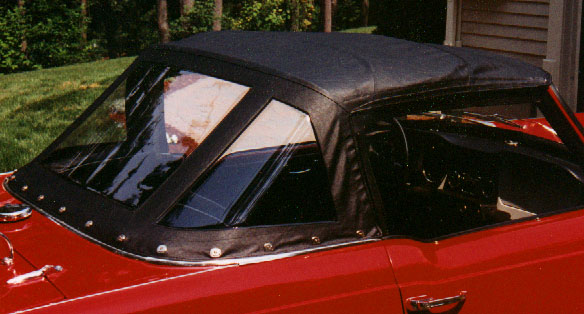
Based on my recent experience, I think installing the top is well within the skills of most TR gearheads. If you did your own interior, panels, seats or tonneau cover... this was only a little harder.
I purchased a new Robbins top from TRF. The quality was excellent but it seemed about 1" too narrow across the front edge where it slides under the capping. It occurred to me to use a heat gun, but I was afraid I would damage the new top material. If I damaged the top or installed one fastener... I was mine. The local "auto trim shop" wanted 8 hours of labor at $50 and hour... so that was a last resort. He actually looked it up in a Robbins dealer guide.
Here's how I went about it:
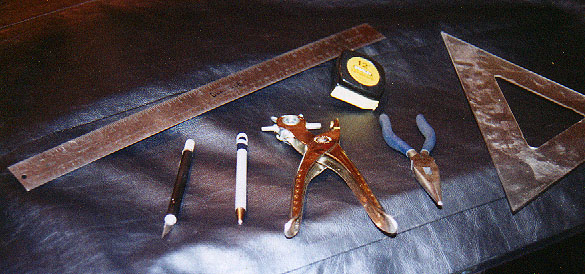
To start with, you will need a basic set of tools:
- High quality straight edge and square with metric calibrations if possible
- Tape measure
- Xacto knife and a supply of #11 blades
- Ball point pen
- Hole punch
- Large needle nose pliers
- Hobby heat gun or high power hair dryer
1. Use your old top as a reference if possible. Install it and take careful note of the position of the front snaps and the hook that attaches at the top of the windscreen side. Make sure you know how each snap is placed and account for any mistakes from the PO. First install the metal strips in the pocket sewn into the front edge. You can steal this piece from your old top or order a new nicely shaped replacement from TRF. Make sure your hoodsticks are up but in the relaxed... pulled forward position.
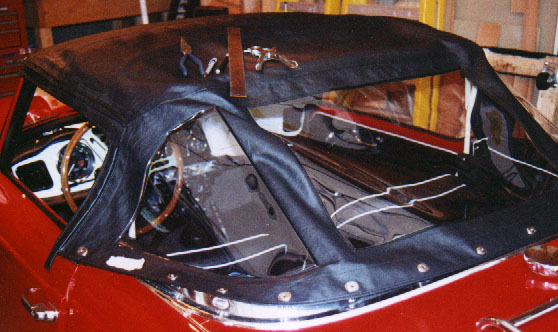
2. Place the top across the hoodsticks. Insert the front lip in under the capping as far as it will go. Mine was a little tight from a new windshield rubber gasket. I used a rubber mallet to make sure the lip was fully engaged. Start out at the front on the side of your choice. We want to install the snap fastener at the forward corner. There is a natural spot where the edging makes a turn. Feel with your fingers to position the male snap on the capping right in the corner with enough room for the full circumference of the snap head. Now check that the side piece that meets the window glass top and the slanted windscreen line up. They should unless things are real strange. Mark the center of the capping snap on the top vinyl with a ball point pen. The pen makes a noticeable mark but can be rubbed off when you finish. If you plan it right all your marks will be under snaps. Using a hand punch make a hole in the top just big enough for the snap cap post. Take the top off the car and take it to a work table with a large surface. I used a maple hardwood stool off the edge of my work table as a hammering backstop. You can find your own solution for this, but you need a hard surface for the hammer tool. If you lucky you can buy the hand squeeze tool. Using the snap installation tool and a hammer, install the snap female fastener in the top.
3. On the other side the lineup can be as much as an inch short.
Place the new snap fastener in the same spot as the other side...
double checking the line up of the side piece. We are going to
custom stretch the front edge using a heat gun. 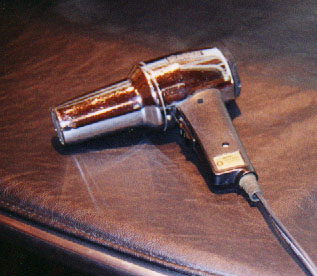 I used a hobby heat
gun left over from my model airplane days. This puts out a lot heat
for shrinking polyester film used in skinning model airplanes. I had
to be careful not to over-heat the vinyl. I good strong hair dryer
will work as well or better. Heat up a section from the middle over
to the other side until the vinyl is hot to the touch but don't go
too far. Then grab the short end and pull hard on the vinyl. You
should gain about a 1/4 inch toward your goal. Next heat the center
section and pull.. another 1/4 inch should come toward the right
spot. Finally... heat the section closest to you and pull again. My
snap rolled on to the capping male post after this process.
I used a hobby heat
gun left over from my model airplane days. This puts out a lot heat
for shrinking polyester film used in skinning model airplanes. I had
to be careful not to over-heat the vinyl. I good strong hair dryer
will work as well or better. Heat up a section from the middle over
to the other side until the vinyl is hot to the touch but don't go
too far. Then grab the short end and pull hard on the vinyl. You
should gain about a 1/4 inch toward your goal. Next heat the center
section and pull.. another 1/4 inch should come toward the right
spot. Finally... heat the section closest to you and pull again. My
snap rolled on to the capping male post after this process.
 4. The next step is to start at the rear by finding the center of
the rear window on the new top at the bottom and marking the
centerline on a piece of masking tape along the edge where the LTD
(lift the dot) fasteners go. Also put tape on the rear capping
between the two center posts. Mark the center line on the masking
tape. Now you can visually line up the spot-on center position for
the first set of LTDs. Lineup your two center lines and use a wide
piece of masking tap to hold the position. Feeling with your
fingertip... use the pen to mark the north/south position of the two
center male posts. The center hole of the LTD should be 23 MM from
the back edge of the top. Mark the east/west line so you have a
cross target. Now use the LTD backing plate as a guide. There are
small marks on the backing plate that you line up with the
cross-hair target. The hole cut out is actually offset a little...
sort of oval. Trace the hole with the pen. Use a hand punch to shape
the hole. place the LTD back plate in place again using the
cross-hair lines and holding it in the middle cut the four slots for
the LTD tabs. Use a very sharp Exacto knife with a common #11 blade.
This is easier with a helper. Don't forget to position the
"dot" aimed at the 9 or 3 o'clock position pointing in the
direction of the door seam.
4. The next step is to start at the rear by finding the center of
the rear window on the new top at the bottom and marking the
centerline on a piece of masking tape along the edge where the LTD
(lift the dot) fasteners go. Also put tape on the rear capping
between the two center posts. Mark the center line on the masking
tape. Now you can visually line up the spot-on center position for
the first set of LTDs. Lineup your two center lines and use a wide
piece of masking tap to hold the position. Feeling with your
fingertip... use the pen to mark the north/south position of the two
center male posts. The center hole of the LTD should be 23 MM from
the back edge of the top. Mark the east/west line so you have a
cross target. Now use the LTD backing plate as a guide. There are
small marks on the backing plate that you line up with the
cross-hair target. The hole cut out is actually offset a little...
sort of oval. Trace the hole with the pen. Use a hand punch to shape
the hole. place the LTD back plate in place again using the
cross-hair lines and holding it in the middle cut the four slots for
the LTD tabs. Use a very sharp Exacto knife with a common #11 blade.
This is easier with a helper. Don't forget to position the
"dot" aimed at the 9 or 3 o'clock position pointing in the
direction of the door seam.
5. Continue this procedure for the two LTDs on either side of the first center ones. When you are finding the N/S line for these next posts, stretch on the material just a little... just to take up a little of the natural vinyl shrinkage (but nothing like the front edge routine). You can punch the inner set first and put the top over the posts to set the next set. This brings you to the LTDs at the bottom of the space between the back windows. Do the snaps that turn the radius one at a time jumping from side to side. The last run to the door can be done all at one time on one side... but I would recommend two at time or you can get too far ahead of your self and miss-punch something. Pull on the material and mark the N/S line. Use the MM ruler for the E/W line and do all the LTDs.
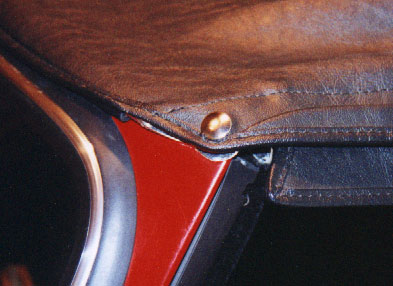
6. The last tricky part is the u-shaped hooks that are installed on the front edge of the side flap. Place the hook on the tab on the windscreen... under the rubber sealing gasket. With the hoodsticks only half relaxed and the front edge and snaps installed... hold the flap in place where it lines up with the windscreen. Don't be tempted to pull it down too far as this will pull down the top when the hoodsticks are set and the top is stretched. My old top has an ugly pucker from this bad fitting of the hook. Position the u-shaped hook on the outside of the flap and trace a circle inside the loops on the hook. I punched these holes a little off the marks to make it a little tighter fit than my pulling on the flap would allow. Remember the u-shaped hook goes on the inside. The special rivet snaps can be installed using a big pair of vise-grips. Place the post on the inside and the "button" on the out side and set the vise-grips so that when you squeeze them to the lock position the button gets pressed onto the post but not crushed too much. You can do the first one in degrees until it looks right. Use the flat front edge of the vise-grip jaws.
7. One more thing. The hoodsticks must be positioned so that the front bow lines up with the front seam so that the overlapping tabs that grab the top don't pull anything but down. If these are miss-aligned the front bow makes an ugly pucker in the surface of the top. The measurement from the back edge of the tall post to the center screws of the holding plate on the rear bow is 21 1/4 inches. I laminated a piece of vinyl, from the scraps leftovers from the panel set, to the end of the cloth strap and lined up the hole with a new LTD facing toward the doors. The top looked like a million bucks when the hoodsticks were set. The rest of the snaps are pretty straight forward if you got this far. Brian Schlorff recommends leaving the top on the car for a 10 days or so and leaving the car out in the hot sun to "set" the top.