|
1962 Triumph TR4 Restoration |
|
Brian Sanborn, Groton, MA |
Take It Apart
This was the fun (and sometimes scary) part. The big fear here.... is that you won't get the car back together again. There are some simple rules of the road to keep you from falling into this pit. The first and most critical is to label and bag everything, and I mean... everything. I am speaking from hands-on experience. You will be tempted to skip this when the work looks very obvious. And even with all the good advice I got on this subject, I occasionally skipped this because I was tired or the parts were so simple that I was sure to remember. Well, I am here to tell you, that something you remove from the car in November, will be difficult to make heads or tails of in April. You have screws, nuts, bolts and parts and don't know where they go, which part goes where or which hardware to use.
Get yourself 2 boxes of Ziplock sandwich bags in the 100 bags size and 2 boxes each of the small and large freezer storage bags. The freezer bags are sturdy enough for the components and parts. Get a stack of large post-it notes, notepad paper or index cards and a good dark marking pen to write with. Also get a small spiral notebook. As you take something apart and remove it from the car place all the bolts, washers and nuts in the sandwich bag and write a note to show what they are for. Anything that is not very obvious, write in the notebook to help you remember 5 months from now what to do.
Don't try to clean things now. Wait until you do the restore work on that part. You may end up replacing lots of the stuff. Also bag all the components in the larger freezer storage bags. Write what it is and its condition on the bag or index card. Get some surplus boxes from work, the kind that are used for copy paper or whatever you can find. Start storing the big parts by project and keep the sandwich bags in shoeboxs, grouped by project. This procedure applies to the engine, gearbox, accessories and all disassembly work.
Take the Plunge
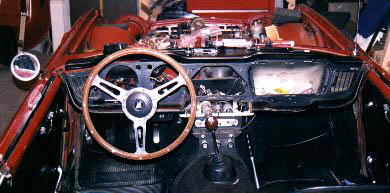
I started in October by removing the radiator because of a leaking solder seam in the top tank extension. It was not my intention to start so soon but while I was waiting for the local radiator shop work, things just started to come off the car. And, the engine was getting more fragile so there wasn't much good driving left. I removed the windscreen in preparation for replacing the glass, top crash pad and all the rubber. Next I started dismantling the wood dash, crash pads, metal dash facia, facia support, gauges and the steering column.
If you plan any work on the engine, radiator or valance area, it's a good idea to get the bonnet removed and off to a safe place. Make sure you protect the edges and the outside painted surface from abuse while it is leaning against a wall somewhere.
I then decided to take the big step and pull the engine. Before you knew it, the seats and interior were stripped out.
|
|