|
1962 Triumph TR4 Restoration |
|
Brian Sanborn, Groton, MA |
Sprucing Up the Engine Bay
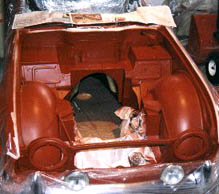
The engine bay in my car was very dirty from an episode of running the engine with no oil breather cap or something that spread oil all over the place and into and under the dashboard. All the wiring and cables in the engine bay under the dash were covered with a sticky oil covering that was attacking the wiring harness.
 I
was getting into full blown shipwrights disease. I told myself that I could not put a brand new engine into an
old tired engine bay. So I decided to strip out all the loose parts and wiring in the engine bay and valance area.
Once everthing was bagged I moved the car outside and scrubbed down all the painted surfaces with gunk grease remover
and sprayed it with hot water. Then came the detailed work with a scoring pad, Simple Green degreaser and toothbrushes.
I had to remove all the grease to prepare for painting. I also did some cosmetic repair work on an old brazing
job in the battery area.
I
was getting into full blown shipwrights disease. I told myself that I could not put a brand new engine into an
old tired engine bay. So I decided to strip out all the loose parts and wiring in the engine bay and valance area.
Once everthing was bagged I moved the car outside and scrubbed down all the painted surfaces with gunk grease remover
and sprayed it with hot water. Then came the detailed work with a scoring pad, Simple Green degreaser and toothbrushes.
I had to remove all the grease to prepare for painting. I also did some cosmetic repair work on an old brazing
job in the battery area.
Once this was done, I cleaned the entire surface with mineral sprits to remove some clear undercoating material on the wheel wells and other surfaces. The last step was to sand everthing with 200 grit wet and dry paper and clean once more with Eastwoods paint prep product. I also cleaned all the steering rack and frame members so they could be painted semi-gloss black.
The paint and primer came from Rimmer Bros in the UK. They carry a line of spray cans with the original TR colors. They are really from Moss International. The resulting paint job is quite good enough for under the hood or for the inside of the boot. I would not use this stuff for outside finish work but anywhere else it works quite well. The first step is the red primer, followed by the signal red top coat. It took 4 cans of primer and 5 cans of final coat at about $6.00 a can.

Now the job was to reassemble everything in prepartion for installing the engine. I rebuilt and repainted the wiper motor to original colors, bought new horns to replace the ones that didn't work very well and cleaned up the grille by using fine steel wool and painting with clearcoat. Everything that went back into the engine was cleaned polished and/or repainted to new. The fuse panel and voltage regulator plastic and bakelite covers were buffed on a polishing wheel to make them look good.
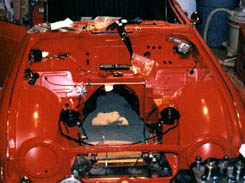
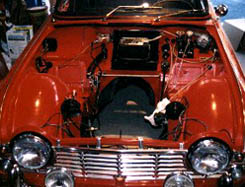
Here you can see the engine bay coming back together. This gave the car a whole new look and would make it possible for me to be really proud when I opened the bonnet to show off the new engine. This was not that difficult to do and it filled up the time for all those dark winter weekends.
|
|