|
1962 TR4 Triumph Restoration |
|
Brian Sanborn, Groton, MA |
The Restoration Begins
Winter '98
After a summer of pure enjoyment... driving the car... installing a new stainless steel exhaust system and fixing the little annoying things... I had a pretty good idea of the true condition of the car. I had to put a plan together and assign priorities. What needed to be done the first year and what could be scheduled for Winter '99 and Winter 2000.
Starting Position
The outside body, the paint and chrome were in good shape and would not need anything but a real good detailing and wax job. The tires, rims and hubcaps were all in good shape. The trunk or boot, as the British would say, was rust free but had not been repainted when the outside had been redone. It was dirty and grimy with primer wearing through everywhere. And, the rear casing board and spare tire cover board were badly worn and scuffed. The gas tank was in good shape with no rust or sediment. This was a big plus. Most of the cars I looked at had problems with rust and gunk in the tank.
The interior was ratty and worn and the two side pieces of the hoodstick covers were missing. It looked OK from 15 feet away but was way overdue for replacement. Someone had painted the hoodsticks flat black. They should be semi-gloss cream. The rugs were really bad and smelled "old". The rubber boot for the gearshift was worn would not stay in place. I replaced this in the first 10 days which got rid of a lot of noise and fumes.
The dash was wood and been borrowed from the TR4A donor car about 20 years ago. It would need to be refinished or be removed in favor of returning the dash to the original 1962 white painted metal dash. The gauges all worked but were dirty under the glass. Although, the speedo and tach were jumpy at higher speeds.
The crash pads were all showings signs of age with cracks along the leading edges. The seats were black vinyl from the TR4A donor car and worn but usable. They would have to be swapped out for the correct early TR4 seats, seat rails and black leather as indicated on the BMIHT build certificate. The car also had a problem with a loose steering column and in addition the shaft had a lot of play within the column. This caused the aftermarket steering wheel boss to scrap away about 3/32 of the steering column metal where they came together. This would have to be repaired or replaced and then rebuilt.
The hood and tonneau cover were old and dull. They had shrunk a little and were hard to use. However, they were useable and the car spent most of its time with the top down in roadster mode.
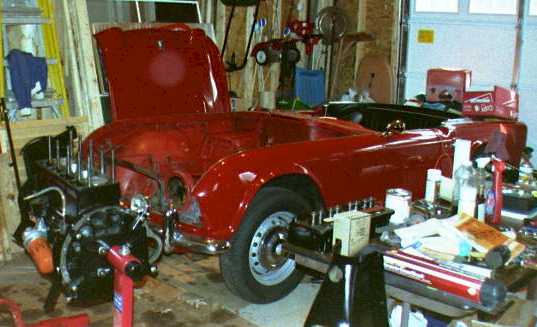
The engine bay was in pretty good shape for an old restoration car. It was not painted when the nice outside paint job was done. So it was like the trunk, all old worn paint and dirty. There was also a big problem with the underside of the bonnet. It had been sprayed with an undercoating type material that had also been used in the wheel wells. It was next to impossible to get off and could not be painted over. I would later find a bunch more under the rugs protecting the floors. This stuff was very popular in the '70s and probably kept the floors and underbody from rust damage. But, if I was going to restore the engine bay this would have to go.
The front grill and headlights were OK except for red overspray all over the headlight bowls and wiring harness. The grille recess of the front valance had been painted flat black at sometime as a backdrop to the grill. Body color was the Signal Red original color.
Take It Off the Road
The winters in Groton start a little earlier than I would like. We have been here for more than 4 years and we
have had snow on Thanksgiving Day for one of those years. My plan was to start the restoration work toward the
end of November, but, I was anxious to get started so I took the car off the road in the first week of October.
I had decided to use the first winter to accomplish the following tasks:
- Rebuild the engine and accessory components
- Rebuild the gearbox
- Restore the dash to white metal, rebuild the gauges and steering column
- Restore and paint the engine bay and rebuild ancillary parts to receive the new engine
- Find and install a pair of usable 1962 vintage seats
- Clean up the interior enough to get by until the following winter.
I would use winter '99 for the full interior and boot restoration, new hood and tonneau; and other non-heavy mechanical work. Winter 2000 would be devoted to a complete suspension rebuild.
I started by taking apart the dash and finding out what was needed and I soon progressed to pulling the engine and gearbox. I realized, early on, that you needed to run all the tasks in parallel to account for the delays for research, finding parts, machine shop work and acquiring the knowledge that was needed. Lots of this knowledge came from reading all the books and workshop manuals, but the most valuable resource was the Triumph Mail List on the Internet. Whenever I was in a bind for what or how to do something I could tap into this wealth of experience and knowledge.
The Projects
In the following subsections of the Winter '98 area, I am going to go through each of the major projects as if they happened in sequence. But, in fact, they were all going on at the same time. This is necessary because the restoration process, by its very nature, has times when you don't have parts, you need to gather information or you just run out of interest for a while. So keep in mind that you end up with huge portions of the car in plastic bags and boxes and must keep a certain amount of project control in a book or in your head to be successful.
Taking It Apart Pulling the Engine
Engine Rebuild
Gearbox
Rebuild Dashboard Rebuild
Back Together